Redis is an open source in-memory data structure storage technology. Redis stands for Remote Dictionary Server. Redis functions as a database, cache management and message broker. Redis supports several types of abstract data structures such as strings, lists, maps, sets, bitmaps, streams and spatial indexes. KincaiHosting's Redis features can be used for cache management such as Memcached. In addition, Redis can also help speed up website loading because it has a search time delay feature and can access data in microseconds. Redis can be activated on all KincaiHosting hosts for free. This guide will explain how to activate Redis on cPanel Hosting.
What is Redis?
Redis is an in-memory data structure storage technology that functions as a database, cache management, message broker and threads. Redis stands for Remote Dictionary Server, is open source and allows fast response in real-time access to various gaming services, financial services, healthcare or IoT.
Redis can be used in a variety of programming languages ​​and can be built on replication, Lua scripts, LRU eviction and provides high availability and ease of system automation. Redis also supports asychronous replication.
Apart from Redis, cache management can also use the Memcached feature in KincaiHosting. Find out more about what Memcached is.
How to Enable Redis on cPanel Hosting
In order for a faster website, you must follow how to activate Redis on the following cPanel Hosting,
1. Login cPanel Hosting
The first step you have to do is login to cPanel. CPanel login can be via https: // domainname / cpanel, according to the email sent from KincaiHosting regarding Hosting Account Information. For those of you who don't know how to log in to cPanel, please read on How to Login cPanel Hosting .
After successful, then you will enter the cPanel page. This Redis feature is only available at a minimum of super hosting packages and above and is available in the KincaiHosting column. All the latest and superior features of the KincaiHosting Team are available here. You can also check the realtime server status .
Then select the menu Redisand click the menu.
3. Enable Redis
By default, Redis is not yet active. If Redis is not yet active, there is a text Redis is not installed. You must activate it first so it can be used. Please click Enable.
Wait a moment for the button to Enableturn Disablered and the socket path. In the example, the socket path is home/websites/redis.sock. This socket path will be included in other system configurations.
Managing Redis Features in WordPress
For you WordPress users, you can use Redis for cache management and speed up website loading. However, you need to install the W3 Total Cache plugin. You can read the steps in the Guide on How to Install W3 Total Cache. Make sure the W3 Total Cache Plugin you are using is the latest version or at least W3 Total Cache version 0.9.5. This W3 Total Cache plugin serves to connect the Redis sock with the WordPress website itself.
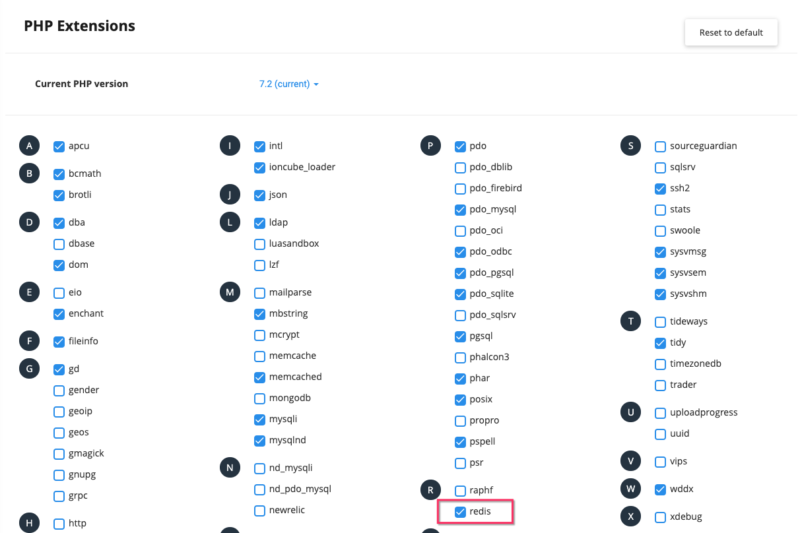
Oh yes, also make sure the option Redison the php version is active! If it's not yet active, then please log in to cPanel. Then, in the search form, please type "php version". Choose Select PHP Version.
Please put a check mark on Redis. After that, click Save.
Basic Configuration
After successful installation of W3 Total Cache, you will find the Menu Performanceon the sidebar (left side). There are 2 menus that must be considered. Namely Page Cacheand Object Cache. For that you only need to activate the Redis feature on the two menus first.
- Page Cache
Please clickPerformancethen clickGeneral Settings. After that, look for the words Page Cache. Then put a check mark on the writingEnable.
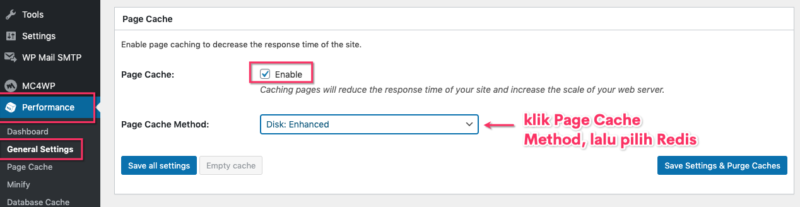
Then in the section Page Cache Methodplease select Redis.
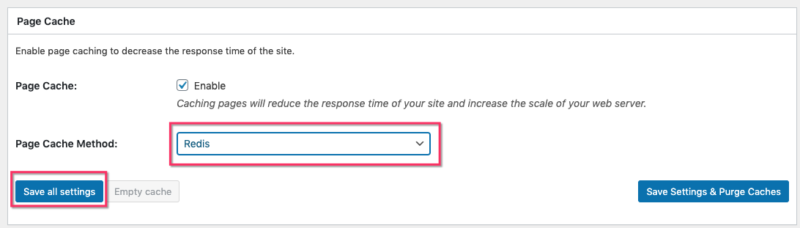
Then it will appear like this. Make sure the section Page Cache Methodappears Redis. When finished, click Save all settings.
- Object Cache
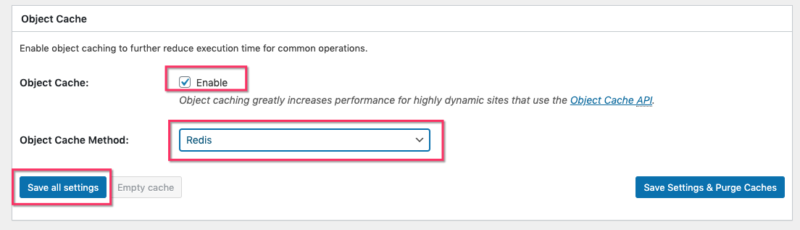
Please clickPerformancethen clickGeneral Settings. After that, look for the words Object Cache. Then put a check mark on the writingEnable. Then in the sectionObject Cache Methodplease selectRedis. When finished, clickSave all settings.
Note: For the latest version of W3 Total Cache, when you first install it will appear like this. For manual settings according to this guide, please click
skip this setup guide. After that, you can just click onPage CacheorObject Cache. If you don't skip it, the menu won't be clickable.

Manage Page Cache
Redis works for more scalable cache management. For that, you have to connect Redis with WordPress via the W3 Total Cache plugin, on the menu Page Cache. Please click Performancethen click Page Cache.

Then in the section Redis hostname:port /IP:port :please fill in the sock path in the cPanel Hosting earlier.
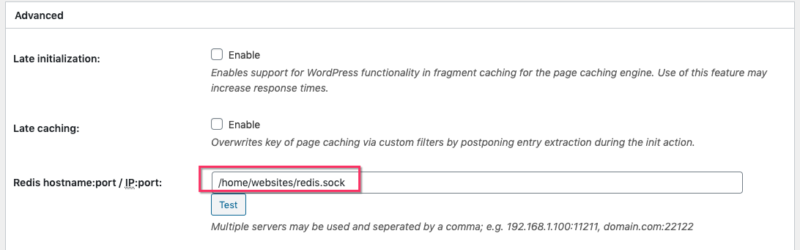
Then click Test. If it appears Test Passedand is green it means that the Page Cache is successful. Don't forget to click Save all settings.

Manage Object Cache
Second, you have to link Redis to the menu Object Cache. Please click Performancethen click Object Cache. Then in the section Redis hostname:port /IP:port :please fill in the sock path in the cPanel Hosting earlier.
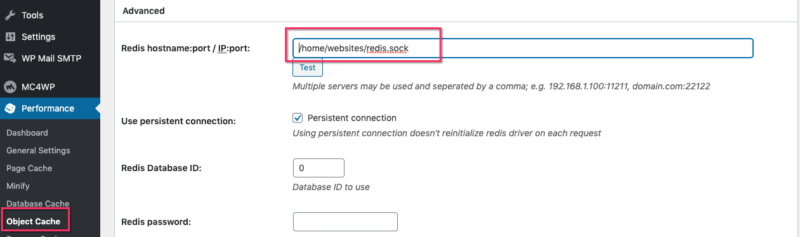
Then click Test. If it appears Test Passedand is green it means Object Cache is successful. Don't forget to click Save all settings.

Conclusion
Redis functions are cache management, message broker, data storage in memory and easier database load for faster website. How to activate Redis in cPanel can be done like enabling the Memcached feature on Hosting. While Memcached puts more emphasis on simplicity and convenience for beginners, Redis has a variety of features that make it effective for multiple usecases. For more, you can read the Difference between Memcached and Redis .